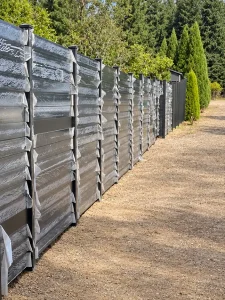
A successful aluminum fence installation begins with accurate measurements and a coordinated system of panels, posts, connections and gates.
Before setting posts, confirm how the panel dimensions relate to the installed opening. Before selecting a mounting method, establish what will support the fence. Before ordering gates, allow for the hardware and operating clearances.
This aluminum fence installation guide helps homeowners, contractors and project buyers organize those decisions before ordering or beginning site work.
Wonderful Metal manufactures custom fence and gate systems from China. Explore our Aluminum Fence collection to compare designs for your project.

1. Prepare a Fence Layout Before Ordering
Create a dimensioned site plan showing the complete fence line.
Include:
- The length of each straight run.
- Corners and changes in direction.
- Pedestrian and driveway openings.
- Ground elevations and slopes.
- Existing walls, columns and paved surfaces.
- Proposed mounting locations.
Give each run and gate a reference, such as F1, F2 and G1. These references can then appear on the manufacturing drawings, component schedule and packing list.
Confirm the property boundary, applicable site requirements and underground utility locations before excavation. Resolve these items before fixing the final fence position.
2. Understand Panel Width, Clear Opening and Post Spacing
One of the most common planning mistakes is treating all width measurements as the same dimension.
| Measurement | Meaning |
|---|---|
| Overall panel width | The physical width of the manufactured panel |
| Clear opening | The distance between the facing surfaces of two posts |
| Post-center spacing | The distance between the centerlines of adjacent posts |
| Connection allowance | Space or engagement required by brackets, rails or other fittings |
| Installation module | The repeating panel-and-post arrangement shown on the approved drawing |
For a panel mounted between posts with external brackets, the clear opening must accommodate the panel and its specified connection allowances.
For a system with rails entering routed posts, the relationship is different. Rail engagement inside the posts must be included in the drawing.
Do not set posts from a nominal “6 ft” or “8 ft” product label alone.
Request a dimensioned installation detail showing exactly where the measurement starts and ends.
Illustrative Spacing Calculation
Assume a bracket-mounted design has:
- A panel width of 72 inches.
- A specified allowance of 0.5 inch at each side.
- Posts measuring 3 inches in the direction of the fence run.
For that hypothetical arrangement:
Clear opening = 72 + 0.5 + 0.5 = 73 inches
Post-center spacing = 73 + 3 = 76 inches
These dimensions demonstrate the calculation method only. They are not Wonderful Metal installation specifications and should not be applied to another system.
3. Select Posts by Position and Function
A fence order should identify post types separately.
| Post position | Function to confirm |
|---|---|
| Line post | Connections for continuing a straight run |
| End post | Connection at the termination of a run |
| Corner post | Connections for the required change in direction |
| Gate post | Support for the specified gate and hardware |
| Transition post | Connections where height, slope or panel type changes |
Gate posts may require a different configuration from ordinary fence posts. Do not assume the same section, wall thickness or foundation is suitable for both.
Post selection also depends on panel height, privacy level, exposure and supporting conditions. A taller, more closed panel needs its own structural assessment.
Review our Aluminum Post range when preparing the component schedule.
4. Embedded Posts vs. Base-Plate Mounting
The mounting method determines how loads pass from the fence into the ground or supporting structure.
| Mounting method | Typical planning situation | Information needed |
|---|---|---|
| Embedded posts | Posts extend into a designed foundation below ground | Soil conditions, foundation design, embedment and finished level |
| Base-plate posts | Posts connect to a suitable structural substrate | Concrete or structural support details, anchor design and edge distances |
| Column or wall connections | Panels connect to an existing structure | Structure condition, connection capacity and attachment details |
Choose the method from the actual site conditions rather than appearance alone.
Embedded Aluminum Fence Posts
The installation drawing should specify the post length, foundation dimensions, embedment and finished fence height.
Foundation depth and width cannot be selected from fence height alone. Ground conditions, frost exposure where relevant, wind loads and gate loads can affect the design.
During installation, maintain the specified post alignment and support the assembly as required. Follow the concrete product instructions and the approved installation sequence before applying loads.
Base-Plate Aluminum Fence Posts
A base plate needs a suitable supporting structure.
Paving stones, a thin topping or a decorative wall cap should not automatically be treated as an adequate structural base.
Confirm:
- Supporting material and thickness.
- Base-plate dimensions.
- Anchor type and layout.
- Required embedment and edge distances.
- Relevant reinforcement or concealed services.
- The specified leveling and bearing arrangement.
Install anchors according to their manufacturer’s instructions. Hole preparation, installation conditions and tightening requirements depend on the selected anchor.
Wall and Column Connections
Check the condition and construction of existing masonry or concrete before approving attachments.
A finished surface may conceal hollow sections, damaged material or insufficient support. Connections should be designed for the actual structure.
5. Confirm the Installation Sequence for Your System
Different fence systems use different assembly sequences.
A routed-post system may require panels and posts to be assembled progressively. A bracket-mounted system may allow posts to be installed first, provided their positions are accurately controlled.
Use the instructions for the purchased system.
A useful first-bay check is to:
- Verify the approved post spacing.
- Confirm panel orientation and connection locations.
- Check the intended bottom clearance.
- Confirm the fence line and top elevation.
- Check how the next bay will connect.
Resolve discrepancies before repeating the arrangement along the whole boundary.
6. Plan Bottom Clearance and Finished Height
Panel height and installed fence height are not always identical.
If a panel is raised above the ground, the top elevation includes that clearance. Ground levels may also change along a run.
Show the intended bottom clearance on the elevation drawing and check it against the finished landscape, paving and any relevant barrier requirements.
Where a fence has a specific containment or pool-barrier function, gaps and clearances need separate verification. A decorative fence should not be assumed suitable for every application.
7. Installing Aluminum Fence on Sloped Ground
Measure the rise and horizontal run of sloping sections before selecting the panel arrangement.
Racked Panels
A rackable system allows the panel to follow the slope within its designed adjustment range.
Confirm the permitted angle and the resulting post layout with the supplier. A rigid welded panel should not be forced into a racked configuration.
Stepped Panels
A stepped layout keeps individual panels level while changing their elevations between bays.
Review the gaps beneath the panels, the exposed post heights and the appearance at each transition.
Custom Slope Panels
Some sites are better served by panels fabricated to an approved slope drawing.
This requires accurate elevation information before manufacturing.
Include slopes in your inquiry for Vertical Aluminum Slat Fencing or Horizontal Aluminum Slat Fencing.
8. Install Gates from a Separate Gate Schedule
Fence panels and gates can share a finish and profile style, but their installation details are different.
A gate schedule should identify:
- Clear opening and leaf dimensions.
- Single or double-leaf operation.
- Swing direction or sliding travel.
- Hinge, latch and stop details.
- Gate-post specifications.
- Ground clearance throughout movement.
- Automation requirements, if applicable.
The clear opening must allow for the specified hardware. Do not make the opening equal to the gate-leaf width unless the approved drawing calls for that arrangement.
For swing gates, check the full movement arc. Rising ground can interfere with the leaf after it opens.
For sliding gates, confirm the operating space, support arrangement and track or cantilever requirements.
Explore our Aluminum Gate collection y Aluminum Driveway Gates USA.
9. Confirm Whether Panels Can Be Cut on Site
Not every aluminum panel is designed for field cutting.
Before shortening a panel, ask whether the modification affects:
- Frame strength.
- End connections.
- Rail engagement.
- Profile spacing.
- Coating protection.
- Product warranty or approved performance.
For custom framed panels, factory production to the required dimensions may be preferable.
If cutting is permitted, follow the specified method for preparing and protecting the modified ends. Do not improvise repairs to structural connections.
10. Inspect Materials Before Installation
Check the delivery against the order and packing list.
Verify panel references, dimensions, post types, finish and hardware quantities. Photograph any damage and resolve missing or incorrect components before installing the affected section.
The published North Haven, Connecticut project provides a real supply reference for custom vertical panels delivered to a residential address.
For another project, confirm the installation documents and component scope separately.
11. Complete a Final Installation Check
Before handover, review:
| Check | What to verify |
|---|---|
| Alignment | Fence line, post plumb and intended elevations |
| Connections | Correct fittings and specified fastener installation |
| Foundations | Completion in accordance with the approved details |
| Puertas | Movement, clearance, latching and specified hardware operation |
| Finalizar | Damage, exposed modified surfaces and approved repairs |
| Site condition | Debris removal and completion of agreed reinstatement |
Keep the approved drawings, product information and maintenance instructions with the project records.
Frequently Asked Questions
How far apart should aluminum fence posts be?
Use the spacing shown for the purchased system. Panel width, connection details and post dimensions determine the installation module.
Can aluminum fence posts be mounted on concrete?
Yes, where the supporting concrete and mounting arrangement are suitable. Confirm the base plate, anchors and substrate before installation.
How deep should embedded fence posts be?
The required embedment and foundation depend on the project design and site conditions. There is no single depth suitable for every aluminum fence.
Can aluminum fencing follow a slope?
Some systems can rack; others require stepping or custom fabrication. Confirm the selected system’s capability before ordering.
Can fence panels be cut shorter?
Only where the manufacturer permits it and provides the necessary connection and finish details.
Are gates installed with the same spacing as fence panels?
No. Gate openings must follow the gate drawing and allow for the specified hinges, latches and movement.
Request an Installation-Ready Fence Specification
Send Wonderful Metal your site layout, fence dimensions, ground elevations, proposed mounting method, gate openings, finish and quantity.
Identify the posts, brackets, fixings and other components you require so the manufacturing quotation can define the supply scope clearly.
Contractors can review Aluminum Fence for Contractors USA. For budgeting, read our Aluminum Privacy Fence Cost per Linear Foot Guide.
Discuss Your Fence and Gate Project
Correo electrónico: [email protected]